Walking from the truck to the workshop, the sky is lit by a brilliant red sky, silhouetting the biplane weather-vane on the ridge. Another clear day of easterlies means it’s going to be a cold morning in the workshop. I open the door, flick on the lights and fill the kettle out of habit. We’ll need the water for steaming later in the morning and the noise of it coming to the boil provides a bit of company in the space.
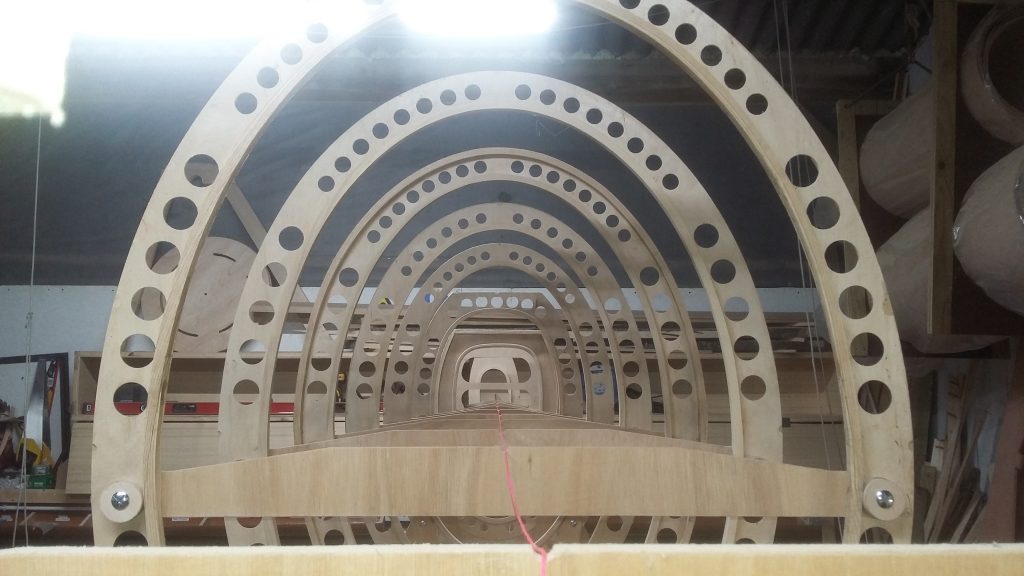
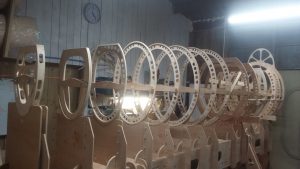
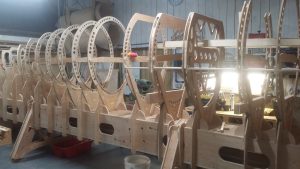
A quick visual sweep around returns me to the point at which I left yesterday. Everything sits where it should. It’s amazing how the slightest change is notable. We are still working on the frames at the tail end of the aircraft, although we are now on the last but one of these and planning to start on the bulkheads that make up the front end of the fuselage. Over at the assembly bench I have a look at the frame that was glued up the previous afternoon.
There is a little glue run out that I can clean up with a carbide scraper but otherwise it is pleasingly clean. The frames are made of 1.5 mm thick birch three-ply profiles, CNC cut with a water jet cutter to create the exact section shape for each specific position along the fuselage.
Each profile has all the appropriate lightening holes ready cut, as well as small reference marks to allow for accurate placement in the jig once assembled. They arrive from the cutting shop as floppy, lifeless shapes that require some work to make useable. We make them into aircraft components by applying shaped sections of wood to the inside and outside perimeters, which stiffens the shape and provides a means for attaching them to the other parts of the framework.
I start work by removing the clamps from the half-assembled frame on the bench. Removing clamps from work is one of my favourite activities in life; a bit like removing wrapping paper to reveal what is inside. There are two different types of clamp in use on the bench to hold the parts of this frame together. To hold the piece flat while the adhesive cures the frame is locked down to the assembly table with threaded inserts that fit into slots in the table.
This allows for unusual shapes to be fastened together flat on the reference plane. Where we have had to join the stiffener ends together with a scarf there are shaped blocks sandwiching the joint with miniature screw clamps holding the tapered ends in place. I look a little more critically at the joints, examining the steam bent hoop for discontinuities and any misalignment. There is a half hair of difference in the thickness of the ash – a fingernail run over the surface shows it up – but it’s well within tolerance. A fine set block plane will remove that when I clean it up and the joint will be near invisible.
Leaning against the large, sliding workshop doors is a large board on which are screwed two curved shapes, creating what looks like an egg-timer shape. Bent around the outside of this are two curved pieces of steam-bent ash that we prepared a few days earlier. These will form the inside perimeter stiffener. I remove the clamps from these and place them into a perforated board which holds them over-bent, so that they will relax back to their final shape when applied to the frame.
The half-finished frame is lifted up vertically, and with an extra pair of hands from El we dry fit one of the ash bends to the inside perimeter of the frame, spring-clamping it at the top and checking that the bend will conform accurately around. The position for the scarf is marked level with the thrust line, and pencilled on with a bevel on both sides.
We unclip the horseshoe shaped stick and cut the joints with the band saw, before cleaning up the surfaces of the joint with a block plane. The ends feather out into nothing and will be difficult to see. We glue the surface of the frame and the face of the stiffener, and then working from the middle outwards use a stapler to fix the stiffener to the profile. Staples work well for this sort of clamping, and can be pulled very easily once the adhesive has gone off. The second half of the stiffener is cut and fitted to the first, before being stuck on and stapled in place. The two scarfs are clamped together and the assembly is hung up out of the way in the roof space to dry.
We are going to need some more bends to create the final frame. I have a rummage around in the stock rack. There are plenty of short ends, but the two longer pieces both have grain that runs out unacceptably for steaming. Another two boards of ash are waiting in the rack. We’ve already surfaced and thickened the material to 9/16”, just over thickness for what we need. I set up the little table saw and we rip off some strips from the board. It comes off the saw quite cleanly – there’s a nice blade in there – but it requires a bit more work to be ready to use. El empties the contents of the kettle into one of the steam generators, turns it on and refills the kettle. It’ll take about twenty minutes to really start making steam. Whilst it’s heating up we can start machining the ash down to its final dimensions.
The electric planer reduces the wood towards its intended size one pass at a at time, the two of us feeding it in and carrying it out of the other end. It’s noisy, repetitive work, but the knives in the machine have been recently sharpened and the finish on the work is good. The stack of ½” x ½” stick stock is placed in the rack, with four pieces selected for the next frame and cut to length. The door of the steam box is opened, they slide onto the raft and it’s closed tightly again. The workshop feels a little warmer having seen the steam, but it’s more likely the sun outside warming the back wall.
While waiting for the ash to soften we have a clear up, get some clamps ready by the forms and locate the previous days frame onto the jig. It needs a bit of a clean – there are a couple of pencil marks that were used to register the parts, a bit of glue to remove, and some staple holes that need disappearing. A rub over with a fine set block plane makes the surface of the stiffeners new again, followed by a quick rub down with some abrasive to knock the arises off the ash. A spoke shave cleans off the inside surface, before wiping the whole assembly over with a cloth dampened with boiling water to evaporate the staple holes. We lift it into its carrier on the jig where it fits perfectly.
The cross spall and braces are aligned and it is bolted in securely. A couple of quick checks using the laser down the centre line and a level across the spall lend confidence that it’s positioned correctly before the obligatory look along the outside of the fuselage to check fairness. It seems to appear and eclipse as it should, so we’re happy. We can test properly for fairness with a batten once the last couple of frames go in. The outside corners of the frames will need bevelling before the skin is applied, and we’ve got about a millimetre to remove. Not a huge amount to play with, but the accuracy of the machine cut parts lends confidence.
We take the softened ash from the steam box one piece at a time and bend it over the formers. Time is critical here. The material quickly cools and stiffens and there is no time for discussion. After forty minutes in the steamer it bends happily and three clamps hold it in place. It’s time for lunch.